Tuesday, 30 July 2019

Creating Django App and Model

The main purpose of the app is to create the Django app for some specific features within the existing Django based project.

Here we are going to learn how to create a Django app and providing the link with the existing projects so that dedicated features may be available as part of our application.

Adhere with my steps as mentioned below and enjoy the Django Web development patiently!!

Step 1: Create a Django main project. In my case, I have created "openchoicemart" project.


Step 2: Now create a app as "profiles".Go to your project root directory and execute below command
> python ./manage.py startapp profiles
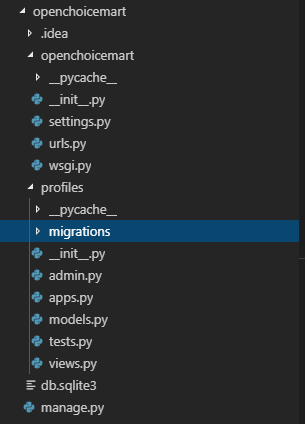
profiles app is created successfully under your Django project now.

Project Structure in Code Editor(Prefer Visual Studio Code)


Designing Profile Model
Now we are going to learn how to design the models and how it impacts on DB?
1) Open the models.py and develop the code as below
from __future__ import unicode_literals
from django.db import models
# Create your models here.
class profile(models.Model):
name=models.CharField(max_length=120)
description=models.TextField(default='Default profile description')
def __unicode__(self):
return self.name

2)Now make the migration ready
>python .\manage.py makemigrations
>python .\manage.py migrate
  and then run the python server
>python .\manage.py runserver
3)Once migration is successful then verify into your respective DB.
   For me, Let's verify it into MongoDB.
   Just start your MongoDB servers and open DB GUI(MongoDB Compass)


Note:
There are several commands which you will use to interact with migrations and Django’s handling of database schema:
  • migrate: which is responsible for applying and unapplying migrations.
  • makemigrations: This is responsible for creating new migrations based on the changes you have made to your models.
  • sqlmigrate: which displays the SQL statements for a migration.
  • showmigrations: which lists a project’s migrations and their status.
Registering Profile model into Django Admin
One of the best features of Django is that we can manage our custom models using builtin and predefined functionalities  using the Django admin page.

Then what we need to do so?

As simple as that, we need to register this model into the Django admin app.

1)Just open admin.py and develop the below piece of code.
from django.contrib import admin
from .models import profile
# Register your models here.
class profileAdmin(admin.ModelAdmin):
class Meta:
model = profile
admin.site.register(profile,profileAdmin)
2)Run below commands
>python .\manage.py makemigrations
>python .\manage.py migrate
  and then run the python server
>python .\manage.py runserver

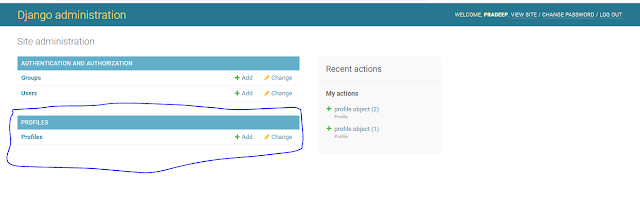
and login into the Django admin page and observer the changes.
http://127.0.0.1:8000/admin


Monday, 22 July 2019

ReactJS: Route using REACT-ROUTER-DOM

Today We are going to understand about the usage of Route using react-route-dom library!


1)We need to install react-route-dom, see the step to install this in below installation link.  REACT_ROUTE_DOM_Installation
2)Develop below component  to see the routing flow
  • /src/pages/Home.js
import React from 'react'
export default function Home() {
return (
<div>
Hello this from Home Page
</div>
)
}


  • /src/pages/Rooms.js

import React from 'react'
const Rooms = () => {
return (
<div>
Hello this is from Rooms page!!!
</div>
)
}
export default Rooms

  • /src/pages/SingleRoom.js-This is class component

import React, { Component } from 'react'
export default class SingleRoom extends Component {
render() {
return (
<div>
Hello this is from Single Room Page!!
</div>
)
}
}

3)Update App.js as below
function App() {
return (
<div>
<Route exact path="/" component={Home}/>
<Route exact path="/rooms" component={Rooms}/>
<Route exact path="/singleroom" component={SingleRoom}/>
</div>
);
}

4)Update Index component of your project as below
import React from 'react';
import ReactDOM from 'react-dom';
import {BrowserRouter as Router} from 'react-router-dom'
import './index.css';
import App from './App';
import * as serviceWorker from './serviceWorker';
ReactDOM.render(
<Router>
<App />
</Router>,
document.getElementById('root'));
serviceWorker.unregister();
5)start server
npm start

6)Browse as below see the impact of routing to pages
http://localhost:3000/
http://localhost:3000/rooms
http://localhost:3000/singleroom

Requirement: Suppose there is no match of url then render the error page

Implementation:
To do so, we need to create use Switch and Route class.

1)Create one Error component as below

  • /src/pages/Error.js

import React from 'react'
export default function Error() {
return (
<div>
This is an error page!!!!!
</div>
)
}

2)Update App.js as below

import React from 'react';
import logo from './logo.svg';
import './App.css';
import Home from './pages/Home';
import Rooms from './pages/Rooms';
import SingleRoom from './pages/SingleRoom';
import Error from './pages/Error';
import {Route,Switch} from "react-router-dom";
function App() {
return (
<div>
<Switch>
<Route exact path="/" component={Home}/>
<Route exact path="/rooms" component={Rooms}/>
<Route exact path="/singleroom" component={SingleRoom}/>
<Route component={Error}/>
</Switch>
</div>
);
}
export default App;


Sunday, 14 July 2019

MongoDB Setup With Django

SQLITE is default database for Django but if you want to use some different database then need to follow below steps:
I have charted down the steps using no sql db(mongo db).But you can follow below steps as well for other database also.Just you need to be careful about some specific database related stuffs.
1)Install Django
   >pip install django
2)Install mongodb module for django which is "djongo".
   >pip install djongo
3)You might have already created Django  project.If not created, create Django project.
4)Create Django App.
5)Add created app to installed app list.
INSTALLED_APPS = [
'django.contrib.admin',
'django.contrib.auth',
'django.contrib.contenttypes',
'django.contrib.sessions',
'django.contrib.messages',
'django.contrib.staticfiles',
'Your_Custom_App'
]
6)Mongo DB configuration in Django
Open Settings.py file and comment out the other databases configuration and update
the database configuration for mongo as below:
DATABASES = {
'default': {
'ENGINE': 'djongo',
'NAME': 'Your Mongo DB name',
}
}
Note:Follow below link for Mongo DB creation
7)Now run migration to see the db effect
>python .\manage.py migrate
8)Let us verify these changes into Mongo db.
To manipulate the Mongodb data, We can use MongoDB Compass GUI which is provided by
MongoDB itself.
MongoDB Compass Download Center

Monday, 8 July 2019

React Component

What is component is React JS?
In react component represents a part of the user interface.A application may have five components header,Side nav,Main content,footer and one root component which
contains other components i.e. Root component is  AppComponent which holds all other components.

Component code can be placed as java script file for example App Component is placed as App.js under your sample react application.
Component basically a code inside the .js file.

Types of component
1)Stateless Functional Component
Functional component is literally a java script functions Which return a html.
Functional component optionally receives of Properties which is refereed to as props and returns as HTML which describe UI.
ie
function Welcome(props){
  return <h1>Hello ,{props.name}</h1>
}

First Functional Component

  • Create one component as Greet.js in src/components folder.

import React from 'react'

function Greet() {
return <h1>Hello Pradeep</h1>
}
export default Greet

  • Import into App.js and Specify Greet Custom tag as below

import React from 'react';
import logo from './logo.svg';
import './App.css';
import Greet from './components/Greet'

function App() {
return (
<div className="App">
<header className="App-header">
<Greet/>
</header>
</div>
);
}

export default App;

2) Stateful Class Component
Class component is a fast component which extends Components class from react library.
Which must render method and  returning HTML.
i.e.
class Welcome extends React.Component{
  render(){
     return <h1>Hello, {this.props.name}</h1>
  }
}
Class components are basically ES6 classes.Similar to a functional component, class component  also can optionally receive props and return html.

Creating a simple class component:
1)Create a file Welcome.js file in component folder as below.
import React,{Component} from 'react'
class Welcome extends Component{
render(){
return <h1>First component class</h1>
}
}
export default Welcome
2)Whenever we are going to create a class component, need to include two imports
one is React and second one is {Component} class from react library.
3)To make a class a react class, there are two simple steps

  • Class should extend Component class from react lib.
  • Class has to implement render method and should return null or some HTML
4)Import class component in App.js
import React from 'react';
import logo from './logo.svg';
import './App.css';
import Greet from './components/Greet'
import Welcome from './components/Welcome'

function App() {
return (
<div className="App">
<header className="App-header">
<Greet/>
<Welcome/>
</header>
</div>
);
}
export default App;

Start the server and feel the impact.


Sunday, 7 July 2019

React JS Installation

React JS Installation
For react we need two things installed
  • Node JS-Go to the official website for node and download the latest one<a href="https://nodejs.org/en/">https://nodejs.org/en/</a>
  • Text Editor-As per yout choice ie Visual Studio Code<a href="https://code.visualstudio.com/">https://code.visualstudio.com</a>
Install create-react-app using npm command
  • npm install create-react-app -g
This command is telling to npm that intall create-react-app package globally on your machine.
Command to check the version
  • create-react-app -version
How to create react app?
  • npx create-react-app myApp-app
Description:Creates new react app.
  • cd myApp-app
  • npm start
Description:To start react app.
Browse Below URL
  • http://localhost:3000/
Installation of some more libraries which will be useful when we start real time websites development.
REACT-ICONS
Include popular icons in your React projects easly with react-icons, which utilizes ES6 imports that allows you to include only the icons that your project is using.
This will be used to render some designed icons from centralized place.But to use them, we need to install this library.
REACT-ROUTER-DOM
This library mainly provides the routing strategies which are very useful in our web development.
Install this library using below command for your project
  • npm install react-router-dom